Lash Expert Secrets Course
Lash Expert Secrets Course
WELCOME TO LASH EXPERT SECRETS - START HERE
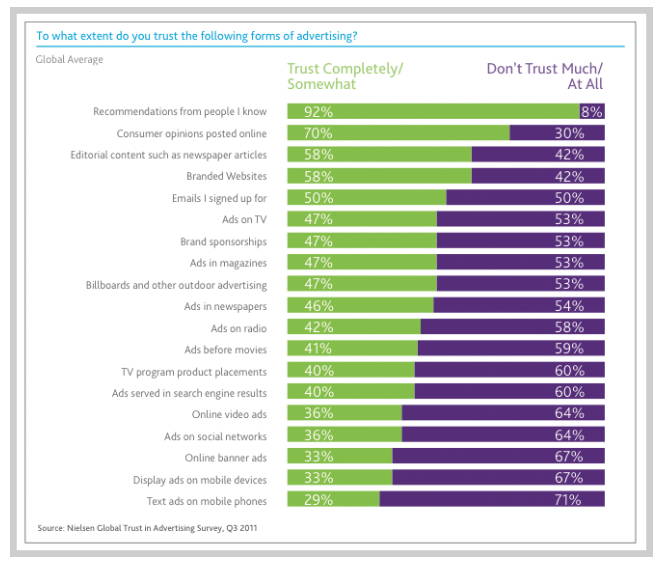
And this is a major part of The Lash Expert Funnel!
In fact, of all the ways you can advertise your business right now, you will learn how to easily get before and after photo’s, testimonials from your clients and get your customers to share their incredible experiences at your lash studio right on their social media channels, month in and month out!
On top of that, you will learn how to use this social validation and referrals and multiply it using an automated email campaign that positions you as the Lash Expert in your area!
Alright! Now that we’ve covered these important concepts, I’m sure you’re excited to take the next step so lets take a look at the what the Lash Expert Funnel (or Customer Journey) looks like next.
Welcome to the 50,000 foot view of the Lash Expert Funnel!
From here on out you will be able see how all the pieces fit together as we go through them and most importantly WHY they are in this order.
We will also go over some of terminology and concepts that may be new to you as well. I want to make sure as you work your way through the program you understand what each term of concept means.
Below is a picture of what the Lash Expert Funnel looks like in action from start to finish.

We’re going to go through each piece and learn how it is the most simple, step by step system to generate an endless list of potential ideal clients. This system also works 24/7 365 days a year, even while you’re sleeping! And once you set it up, all you need to do is follow it.
I have laid out the entire system as an image so you can print it out or refer back to it anytime you want, especially while you are creating each step. You can continually keep referring back to it if something doesn’t make sense. Sometimes pictures make things easier to understand as well, I know they do for me!
Also, here is a list of words or concepts I’d like to introduce you to as well, so it makes sense as we go through the system. You can also refer back to this anytime you need:
Ideal Client: a long term client who you would love to work with who has certain characteristics like age, income, job, kids, etc… The more you can design your lash studio and its marketing to attract your ideal client the more successful you will be over the long term.
Your list: comprised of the names, email addresses and phone numbers of your current ideal clients or potential ideal clients who haven’t yet become paying customers. To grow your list of potential ideal clients is your number one marketing goal. Once a potential ideal client joins your list, your goal is to get them to know, like and trust you and to become the lash expert in their eyes. If you can achieve this, they will most likely become a paying client and refer their friends and family to you as well.
Traffic: different online avenues like Facebook, Instagram, Google, email lists, blogs, etc.. that contain groups of people and which some of these people will be your ideal clients. Traffic can also be cold, warm or hot. This refers to how well this group of people currently know, like and trust you. Cold traffic would be people that do not know you at all. Warm traffic would be people that know of you and your business a little bit. And hot traffic would be the people that absolutely know, like and trust you and are ready to be your paying customers. To them, you are the expert in their eyes, and they have seen enough social proof from your current clients and education to validate their thoughts about you.
Irresistible Offer: Something that your ideal clients can’t refuse. We will use this as our ad to catch our ideal client’s eye as they are scrolling through their social media. I recommend using “Lash Models Needed -FREE Set Of Lash Extensions Valued At $ X amount”. Part of our system is having lash models one day a month to practice new techniques on and by having this irresistible ad running we will attract a ton of interest and have a lot of potential ideal clients sign up to join our list to possibly be one of our lash models on a training day and eventually long term paying clients.
OTO or One Time Offer: This is an offer we give our ideal clients once they join our list. It truly is a one time offer you give a potential client for joining your list that must be used within a certain time frame. Typically 7-30 days from when you offer it. I have always used a $50 OFF a full set OTO as a strong incentive to get my new people who join my email list to take advantage of and become a long term client. I am able to do this because I price my full sets quite high in my area and can afford to do this and created my lash menu for this reason. You can however use whatever OTO you’d like. Examples can be a percent or dollar amount off a full set, free product or aftercare product with a full set, free brow shaping with a full set or whatever you choose to get your new person on your list to become a paying customer!
Traffic You Own: this is your list full of potential clients. The reason you “own” this traffic is, because once they are on your list, you can email or SMS anything you want, anytime you choose. And its completely free! The bigger your list, full of potential ideal clients, the more income you will make! Guaranteed!
Marketing Assets: Marketing Assets consist of Before and After photo's, Testimonials, Snap Shots of Social Proof and validation. These are extremely important assets to have in any business.
Most businesses spend a great amount of time and money to create these, but you will learn how to create them virtually for FREE!
You can now use these assets anywhere you want to position yourself as the Lash Expert in your area! You will use them in your ads, your landing page, in your emails to your list, your website and of course your own social media channels!
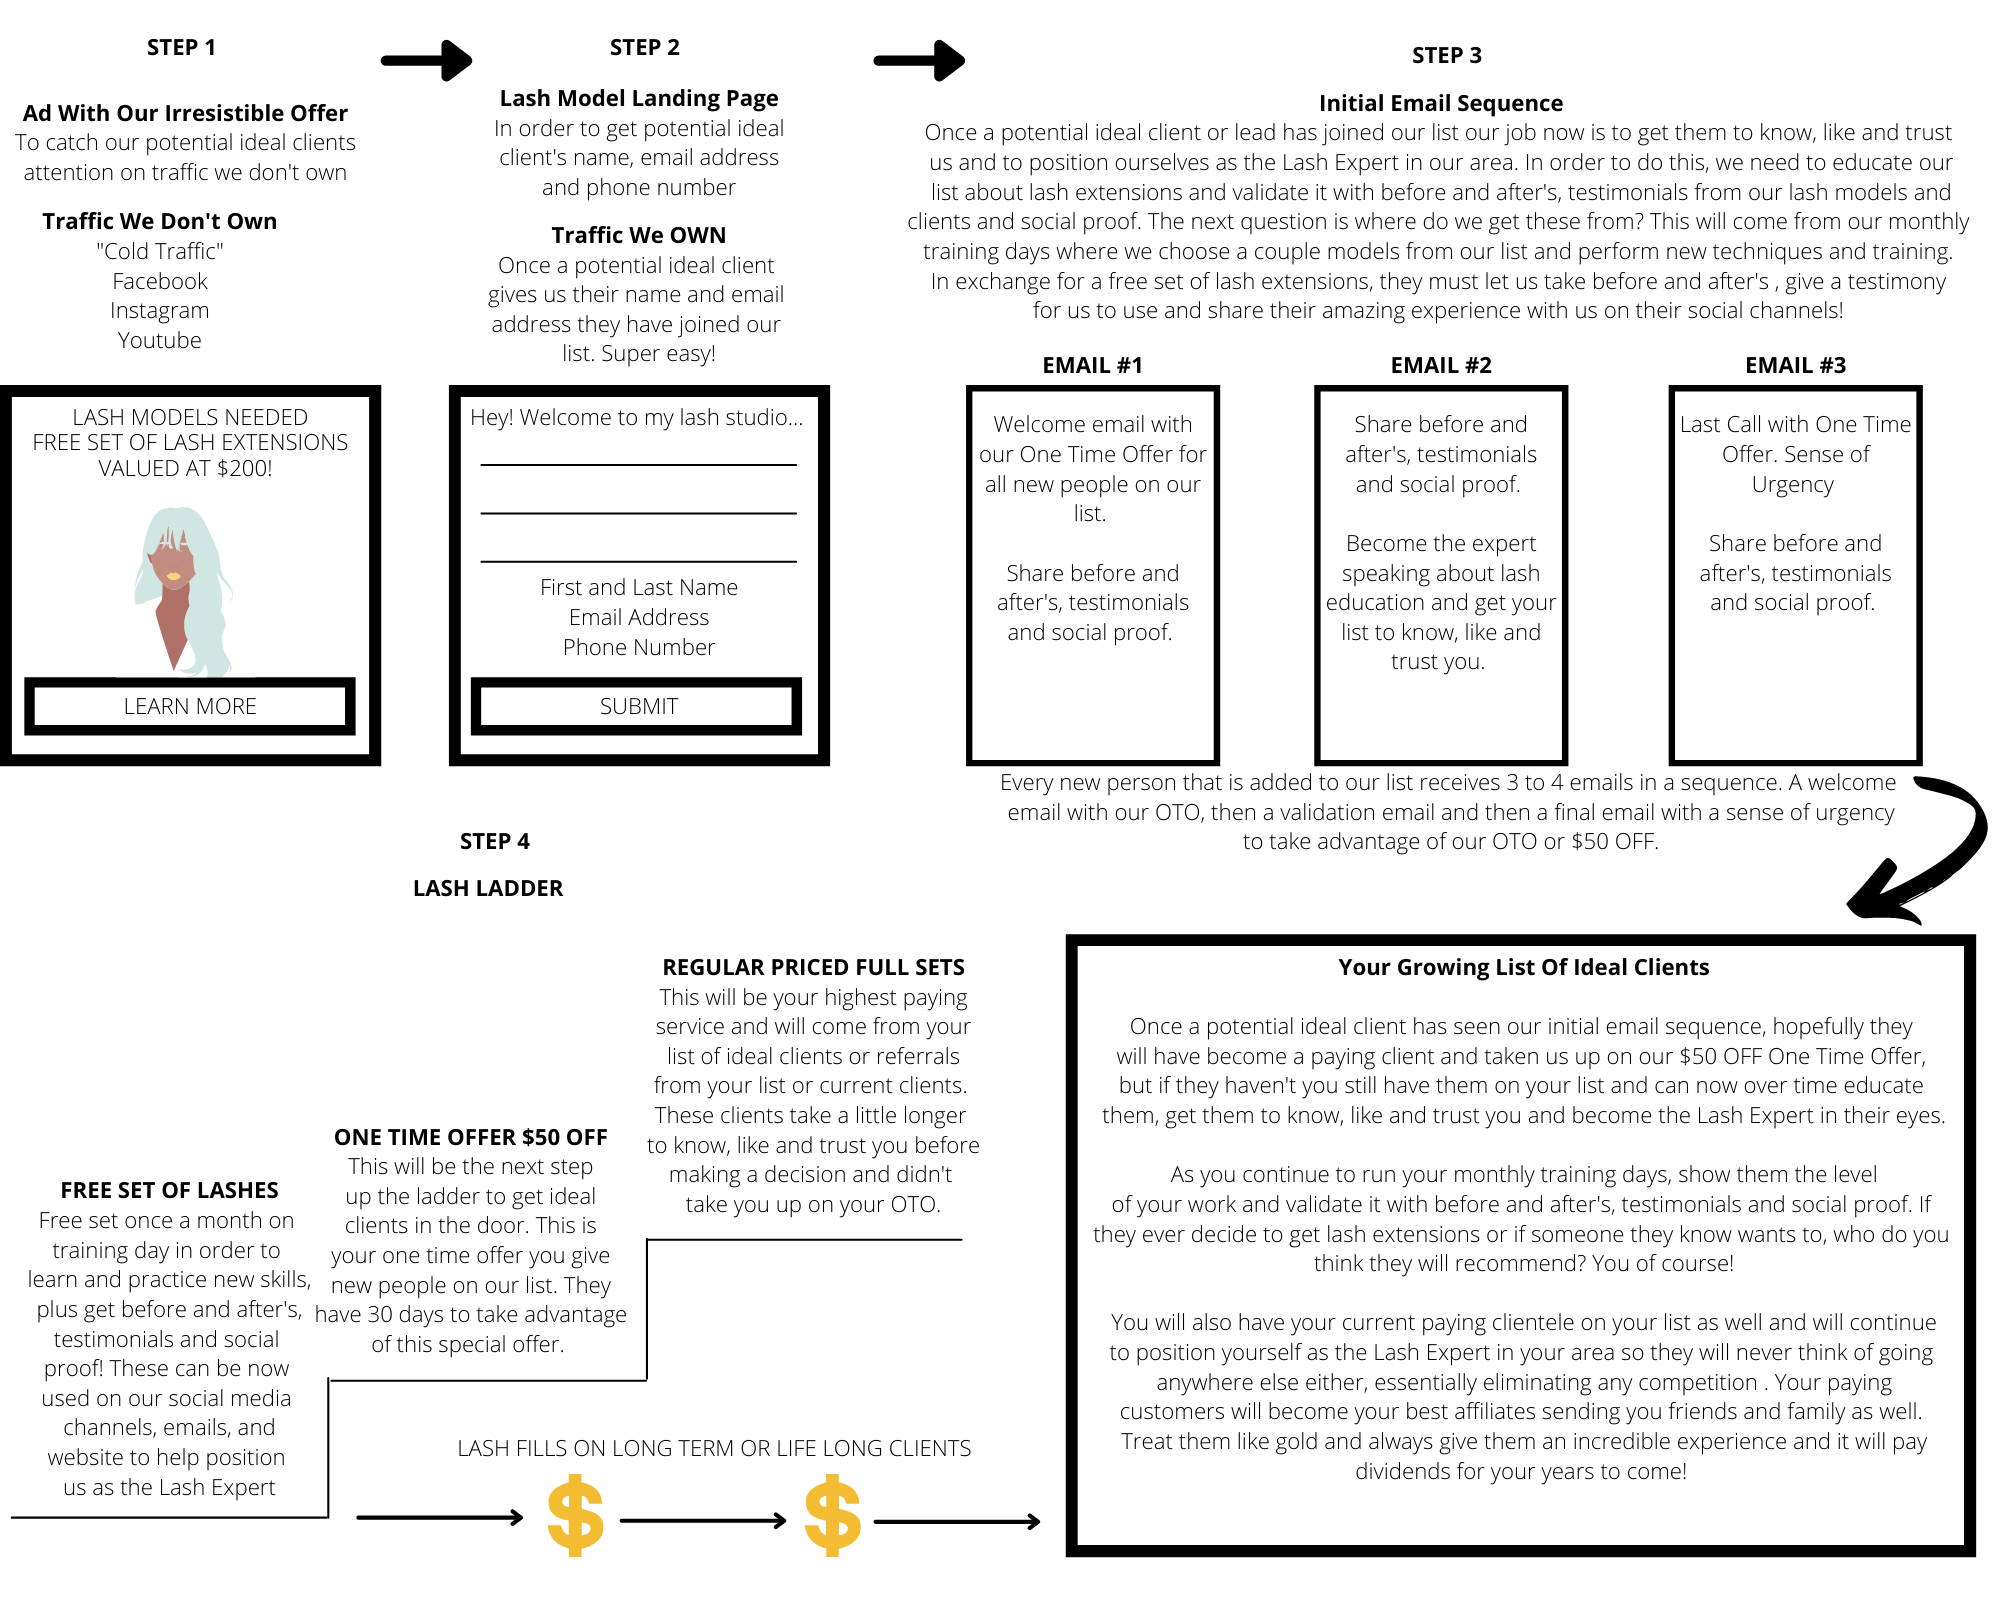
Please use this as your roadmap as you are building out your funnel.
Below is a copy of the Lash Expert Customer Journey for you to download and print out.
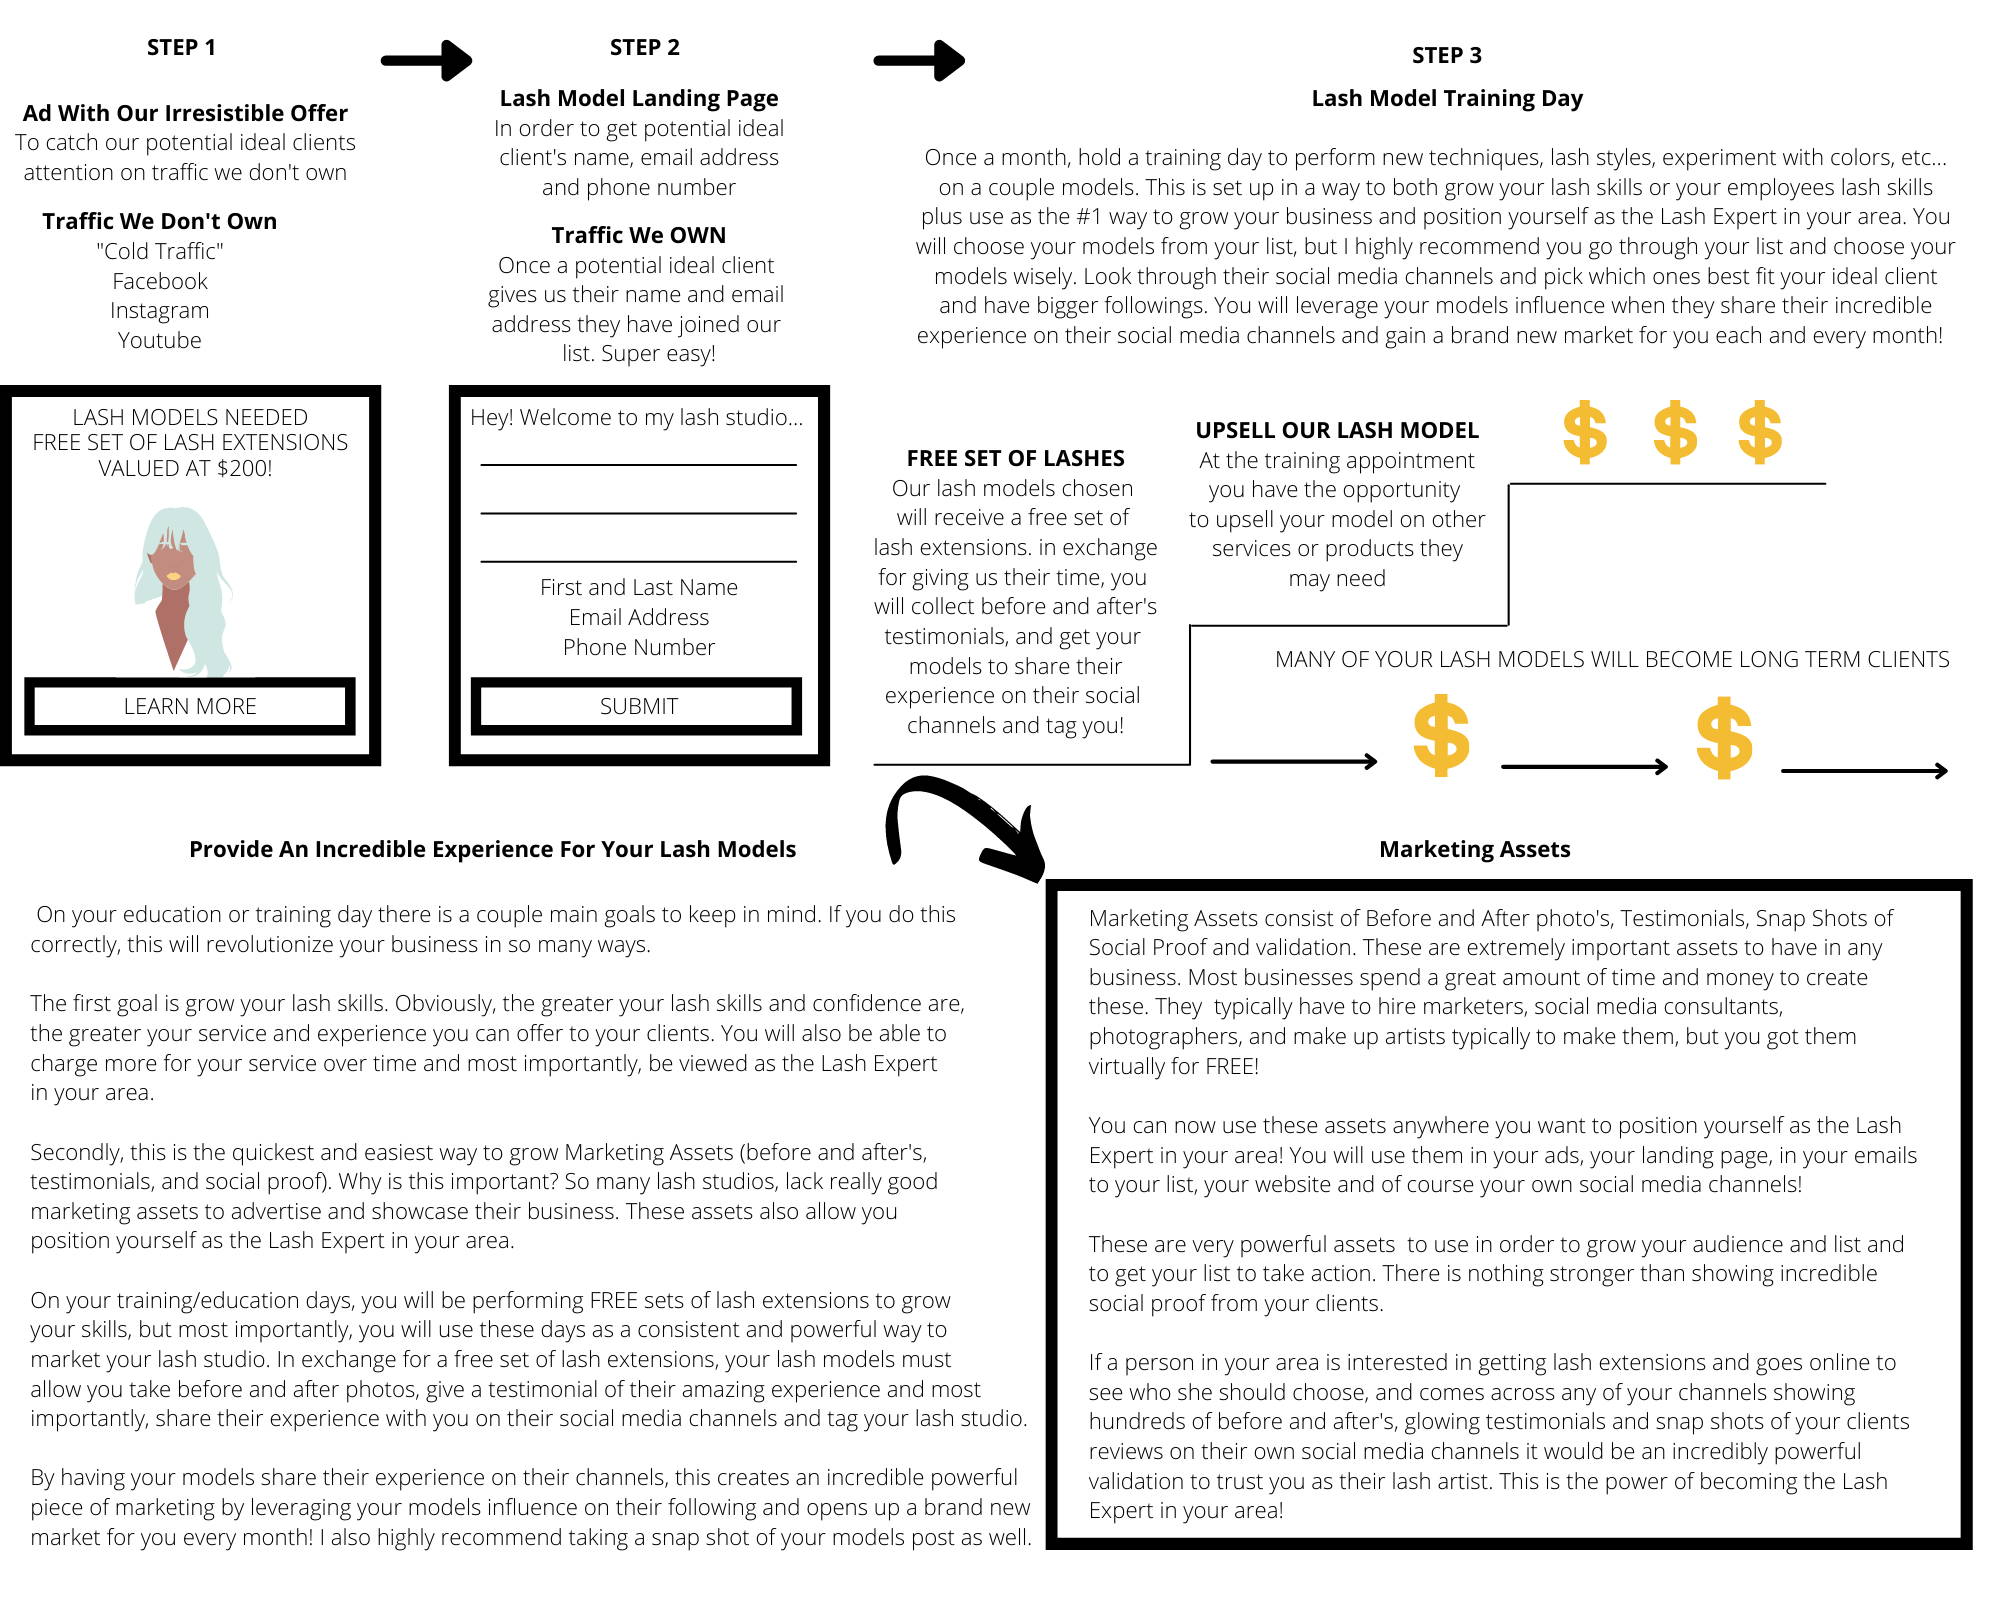
Please use this as your roadmap as you are building out your funnel as well. This will be the journey your lash models will take with the ultimate goal of having them as long term or life long paying clients. However, along their journey, they will assist your business in gathering marketing assets and allowing you to practice and hone your skills.
Below is a copy of the Lash Model Journey for you to download and print out.
Zero To Booked
Discover your IDEAL CLIENT, WHERE to find them and HOW to attract them effortlessly, 24/7/365 - even while you sleep!
Learn how to position yourself as the expert whether you're just starting out or want to own your own lash studio and have multiple lash artists working for you!
Ideal Client Workbook
This document will help you design your Ideal Client. By the time you’ve filled in the blanks, you’ll know exactly WHO your ideal client is, WHERE to find them and HOW to price your services accordingly. This may be one of THE most important steps you can perform in your business. Defining your ideal client determines the look and feel of your entire business and ultimately your success.
Ideal Client Pricing Assessment
Determine what your ideal client will pay for your services and what you should be charging in your area.
Client + Sales Numbers
In order to know where we are going you need to follow a system or road map. This worksheet will give you an accurate assessment of your potential sales per week and per month. It will also give you a great visual as to how many ideal clients you or your lash studio needs in order to be completely booked.
The Ultimate Lash Menu
Now that we have your ideal client, we want to create your lash menu designed specifically for them.
In this worksheet, we will go over pricing and strategy and what I believe to be the best pricing structure for long term success, in the lash industry.
- START
- STEP 1
- STEP 2
- STEP 3
- STEP 4
- STEP 5
Congratulations on getting this far!
You now know exactly WHO your IDEAL CLIENT is, WHERE to find them, and how much to charge them for yourservices! You also know what IRRESISTABLE OFFER you’re going to use to attractthem effortlessly with your FREE SET OF LASH EXTENSIONS ad for your trainingdays! You’re nearly there!
Now all you need to do, isset up your Lash Expert funnel to create an endless stream of potential idealclients joining your list and then get them to KNOW, LIKE and TRUST you andeventually become long time or life long paying clients!
But now I’m sure your next question is probably what programs or technology do I use to create my LashExpert funnel?
Don’t worry! I’ve got youcovered and it’s way easier and simple than you’d think!
Before I get into the programs I have used over the years to create my funnel I want you to understand that Ihave created this system to be evergreen. That means depending on when you arereading this and creating your funnel, some of the programs may have changed ordon’t even exist any longer. This has definitely happened to me since I began myjourney in the lash industry, but there is always a way and typically many software’sor programs that fulfill the same purpose. (The good news is that you trulyonly need one program to do them all if you choose!)
At this point, this iswhere you may need to use some creativity and do a little research in order tofind what works for you. Please do not throw in towel at this stage of the gameif something doesn’t come together instantly. It will be well worth the smalllearning curve once you’ve put it together!
The really great news isthat as I am writing this, there is one software that can do all of it for youand I will share that shortly.
The second reason I havecreated this program to be evergreen is that many lash studios currently have awebsite or an email program they already use and love. So I want to be able toincorporate this program to be used by everyone, those starting out right fromscratch and those of you who have been in the industry for years, but arelooking for a way to grow your studio further and make things more efficient.
The first step in yourlash funnel is to create an ad with your IRRESISTABLE OFFER to stop yourpotential ideal client scrolling through Facebook or Instagram or whatever andclick!
At this point, I highly recommend you print out the Lash Expert Funnel or Customer Journey if you haven't already so you can reference back to it as we build each step out! This can be found in Lesson 3.
So here we go! Onto step 1, creating your ad!
Step I: Your Ad
You can use any traffic platform you want and typically everyone has their preference. You can use Facebook, Youtube, Google, Instagram, Tic Tok, Pinterest, etc… It honestly doesn’t matter which platform you decide to go with but choose which one works best for you and the one you feel most comfortable on! I have always used Facebook as it makes it extremely easy to create an ad and focus in on your ideal client personality.
I highly recommend heading over to Google and searching, “how to create an ad on Facebook tutorial in (current year)” or for whatever platform you choose to use. This will give you the most up to date version of ad creation as these platforms are continually evolving and they can’t all be covered here.
The best part of ad creation is that they are typically pretty easy to set up and you can use the ad blueprint I have created and simply tailor it for your lash studio. You can literally copy my ad word for word if you like or tweak it too. Please find the ad blueprint below.
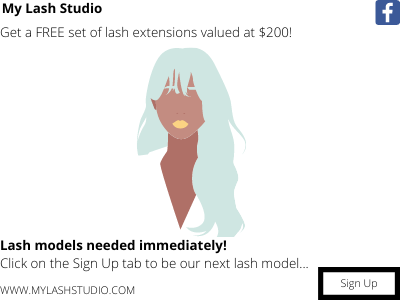
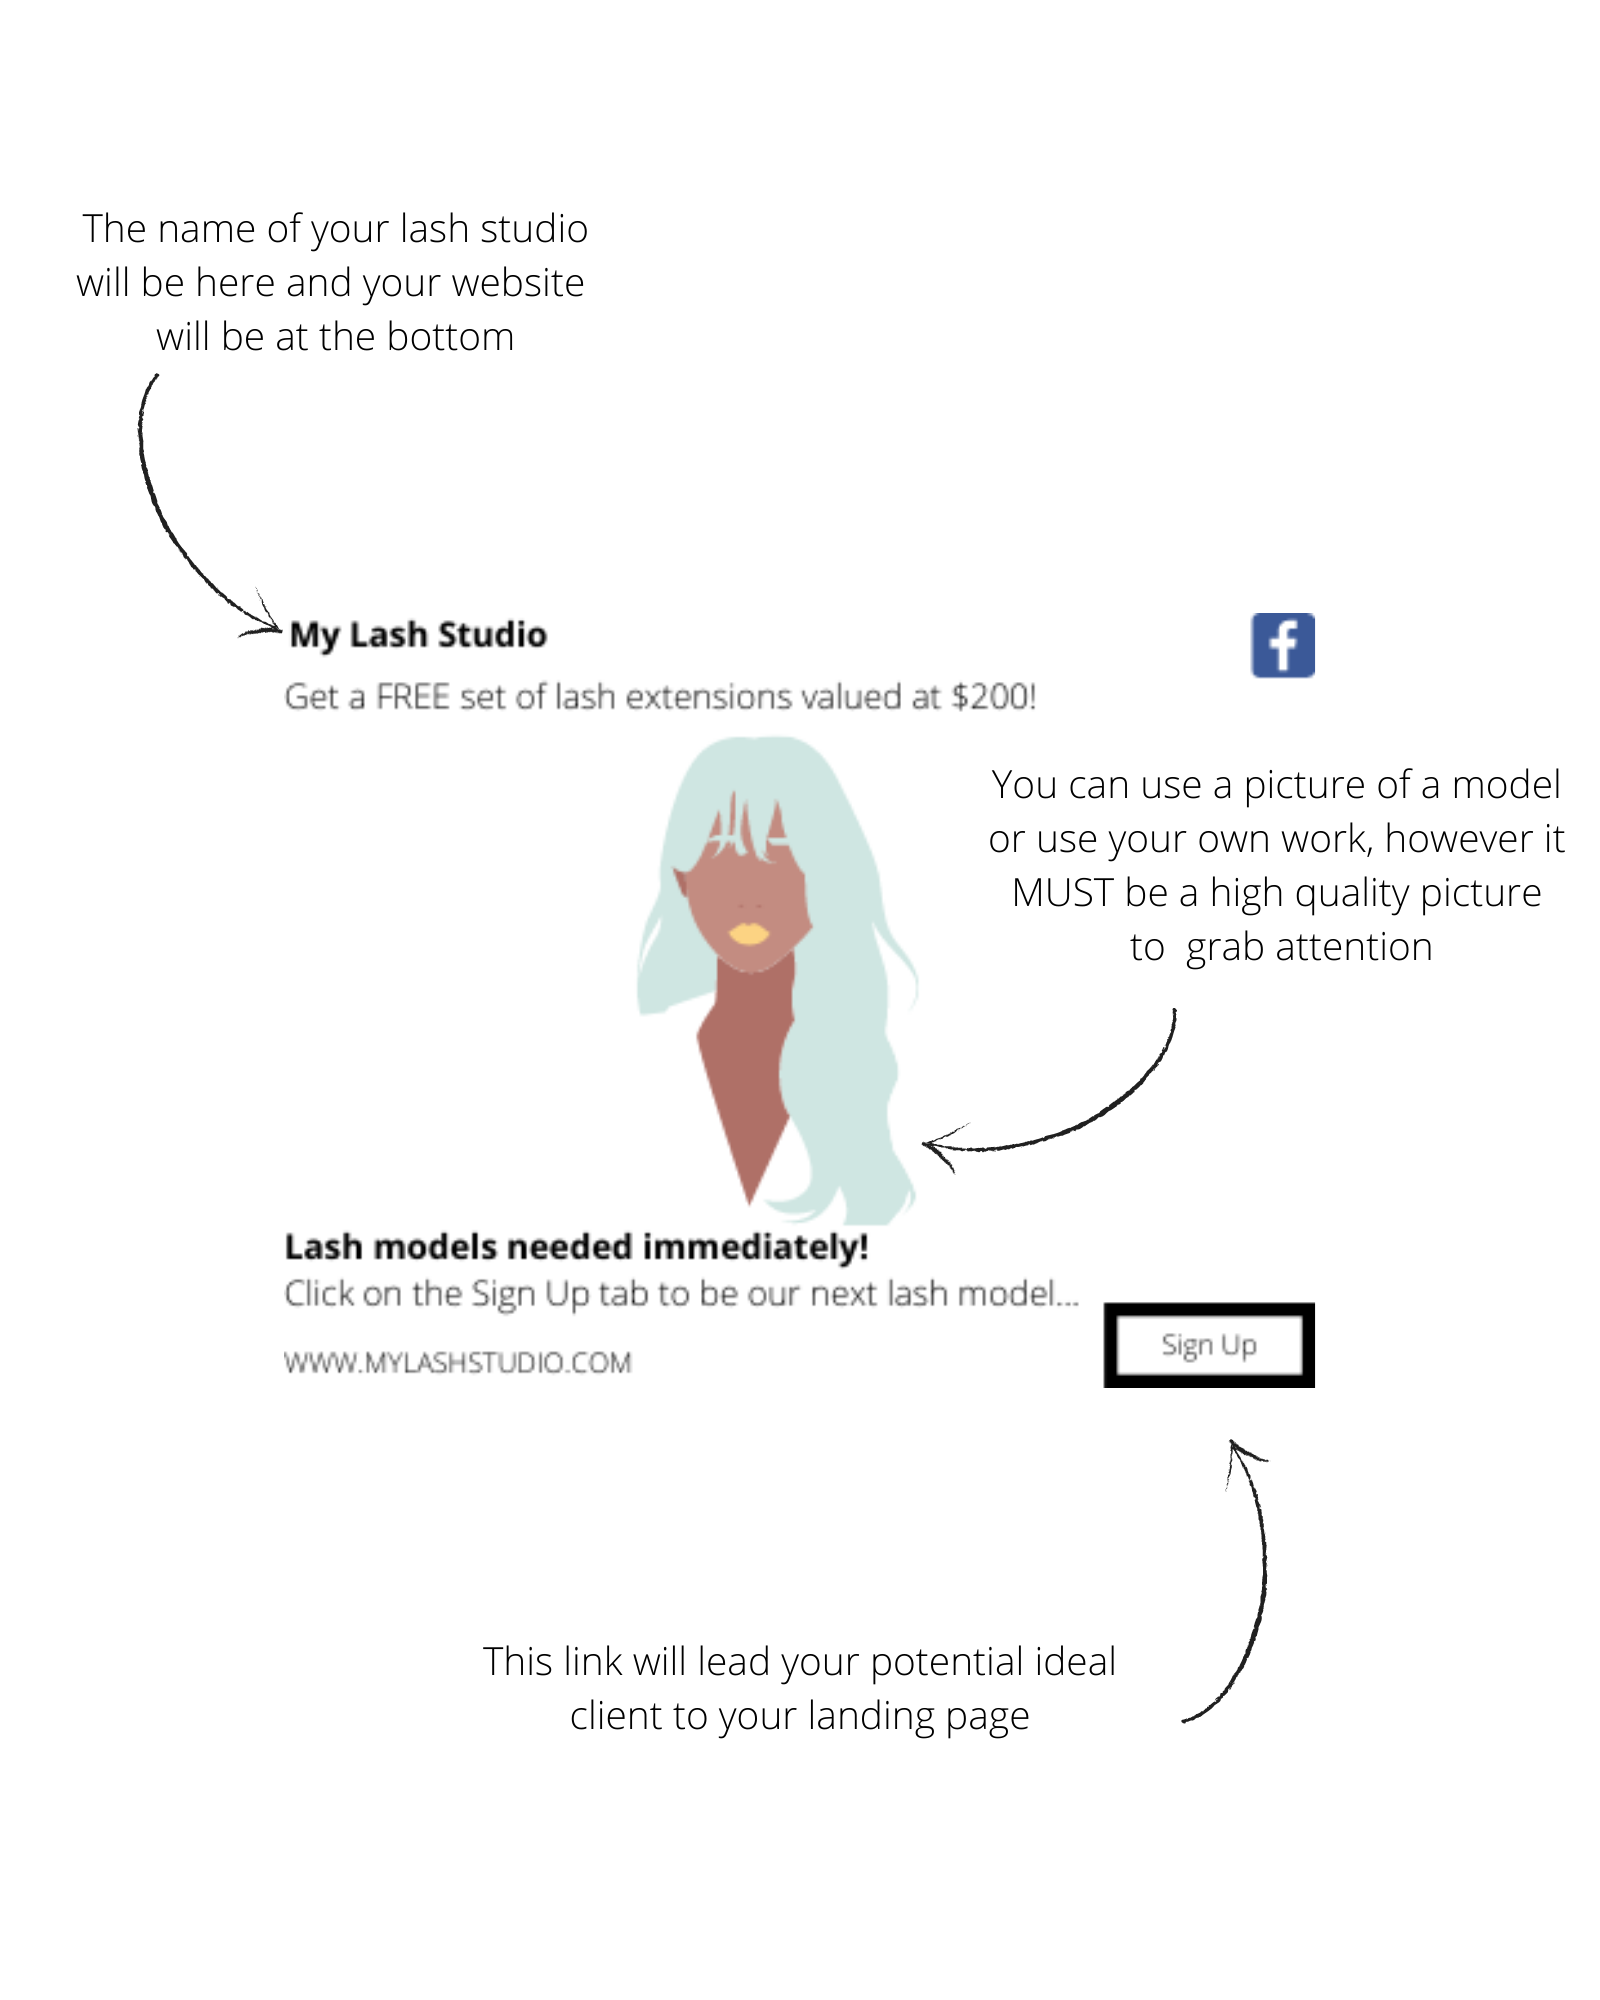
Simply change the dollar amount for your full set pricing to reflect your studio pricing and away you go!
Step 1 done!
Next step on the customer journey, after they click on your ad, is they will be brought over to your landing page.
The entire goal of this page is to get them to enter their name and email address. That’s it! Once they do, they are now part of your list forever and you can market to them for FREE anytime you want!
On to step 2!
Step 2: Landing Page
Once you’ve created your ad, you need to send your traffic that clicks on your ad to your Landing Page. And you have a number of options here which is a great thing. If you currently have a website for your lash studio, you can create a Landing Page simply by adding a new page and connecting an email provider to that.
If you don’t have a website yet or don’t want one, I highly recommend setting one up. It doesn’t have to be anything fancy, but it is a great place to send traffic and put up your social proof, before and after pictures and testimonials all in one place.
For those of you who don’t have a website, there is still options. I recommend using:
Mailchimp or Typeform
Both are very user friendly and can create beautiful efficient landing pages. And as I am creating Lash Experts, both have free and paid options. With both software’s, I started out with the free option and upgraded to a paid version of Mailchimp over time. I also highly recommend using Mailchimp as an email provider, so you may want to just use it for both your Landing Page as well to save you time, but Typeform works great and connects with Mailchimp.
Again both of these programs are ever changing and evolving so I recommend looking up, “how to create a landing page with Typeform” or “how to create a landing page with Mailchimp”. Both will give a number of tutorials on how to create your landing page step by step! Currently, Mailchimp has a number of user friendly tutorials right on its platform under “resources”
Here is a current link to creating a landing page on Mailchimp. Click Here.
Once you have decided on your software or if you are going to use your current website, simply use the Landing Page blueprint I have given you and tailor it to suit your lash studio.
Again you can copy the Landing Page blueprint word for word or tweak it however you want! Simply add in and swap any of your business information and away you go!
Please find the downloadable Landing Page Blueprint below.
Now once a potential ideal client joins your list, you have two goals!
The first is that you will offer all new people on your list a One Time Offer of $50 OFF a full set of lashes in the next 30 days (or you can choose whatever One Time Offer you are comfortable with) to see which new people on your list are wanting to be paying customers right away!
Now don’t sweat it, as only a percentage of your list will take you up on this initial One Time Offer right away. We just want to see which new people to your list our excited customers wanting lash extensions right now. Timing is everything.
The real goal is to have them on your list and get them to KNOW, LIKE and TRUST you over time and when the timing is right and they want lash extensions, you will be the first name they turn to, as they will be comfortable with you and you have become the Lash Expert in their eyes.
So, the first thing a person who is new to your list will get, is a 3 part automated email series or sequence. And it is just like it sounds. Automated. Once you set this up in Mailchimp or whatever email marketing software you choose, you’ve done the work. The rest is automated, and you never have to touch it again!
This may, however, be the biggest learning curve for you, if you’ve never done this before, but don’t worry! I’ve given you the entire 3 part email series script! All you need to do is set it up and then forget about it!
Here we go, Step 3, setting up your email marketing software!
Step 3: Email Marketing Software
(Where your “list” is kept and where all your emails are sent from)
This will become a very important part of your lash studio and if done right, will make you a great deal of money in the future.
The great news is that there are a lot of email providers out there and many of them do a great job. Again, if your lash studio already has an email marketing software in place and you’re already sending out emails, congratulations as this will be super easy to integrate into your business and you can continue using whatever software you currently have.
If you are like most lash studios and do not have an email provider set up there is a number of options, but these are the ones I prefer to use:
1. Mailchimp
2. GetResponse
3. Constant Contact
They all do a good job and I have used all three, but my personal favorite is Mailchimp. It is very user friendly, has great tutorials and resources right on its platform and many others on Youtube. It also integrates with most other website providers and other software’s. Mailchimp is always evolving and has greatly improved it services and options over the past decade.
You can click here to head over to the Resources page on Mailchimp. From here you can go to the search bar and look up how to make your regular emails, automated sequence emails, landing pages, website building and so much more! They have done a wonderful job of putting together step by step tutorials of their software and everything you need to create this funnel and so much more.
At the time of this writing, it still has a free version as well as a number of paid versions starting as low as $10 a month (As I am writing this, I believe Mailchimp is requiring any users wanting to create automated email series to have a paid membership starting at $10. This might have changed depending on when you are reading this). If you currently do not have a website and need to set up a landing page and create your list, I highly recommend using Mailchimp. They also offer the option to host a website plus much more. You can learn more about creating a website with Mailchimp here.
Once you set up your Mailchimp account, (again this can be found directly on their site), create your 3 part automated sequence for your new list. And again you can find my 3 part series blueprint below and use it word for word or tweak it to suit you. Definitely personalize it and make sure all your personal information is correct before you hit “Go”.
Once you have your automated series or sequence up and running, all you need to do, is run your training day once a month and get your growing list to KNOW, LIKE and TRUST you.
You will do this, by sending out 4 emails a month which you can also post on your social media channels or put up on your blog. It is completely up to you how much work you’d like to do. I am just giving you the foundation and all the information to do so. Obviously, the more work you put in, the greater your results will be. But you can also cherry pick parts of this system and use them too. Just know, this system works if you do.
And in this way, you don’t have to be constantly wondering what to post or blog about it. You don’t need to reinvent the wheel. You can also find how and when to send out these emails by looking on the Marketing Calendar and The Weekly Email Brainstorming Ideas. These will be found in Step 4 and be able to be downloaded.
Again, don’t get flustered in the beginning trying to set up your email account and automated series or even with your weekly emails. This might be a completely new concept for you, but just as you learnt how to do lash extensions and it felt completely foreign in the beginning, you soon will be comfortable with this process, and you will completely rock it!
You are smart and powerful, and this system will completely transform your lash studio! Just stick with it! It’s not a matter of if, but when!
In conclusion, as long as you are able to build out each step of the Lash Expert funnel, you can go ahead and use whatever software(s) or platform(s) you are currently using, but if you are starting from scratch, I highly recommend using Mailchimp as it really has evolved into an all-in-one marketing tool to create your website, landing page and host your list and send your emails for you! This will save you a huge amount of effort and money and get you off the ground and running in the fastest time possible!
Remember, just like McDonalds, the reason they have had such great success is because of their simple systems. This funnel is very simple and works extremely well because it can be replicated so easily. Mailchimp makes it that much easier, but it can be done with other software products as well with the exact same results.
At this time, I do want to mention again that nothing great comes easily. If it was, everyone would do it. And just because something is simple doesn’t mean its easy. Just like anything else, doing something new for the first time is a learning curve. Don’t get frustrated the very first time you log into Mailchimp if it seems a little complicated and foreign. In no time, you will know your way around their platform, and it will feel natural. And if you do have any issues, please use their Resources page and head over to Youtube and look up videos on how others are using Mailchimp or the software you’ve chosen. There is a wealth of how-to-videos out their to help you!
I know you’re going to crush it!
Onto Step 4!
Marketing Calendar
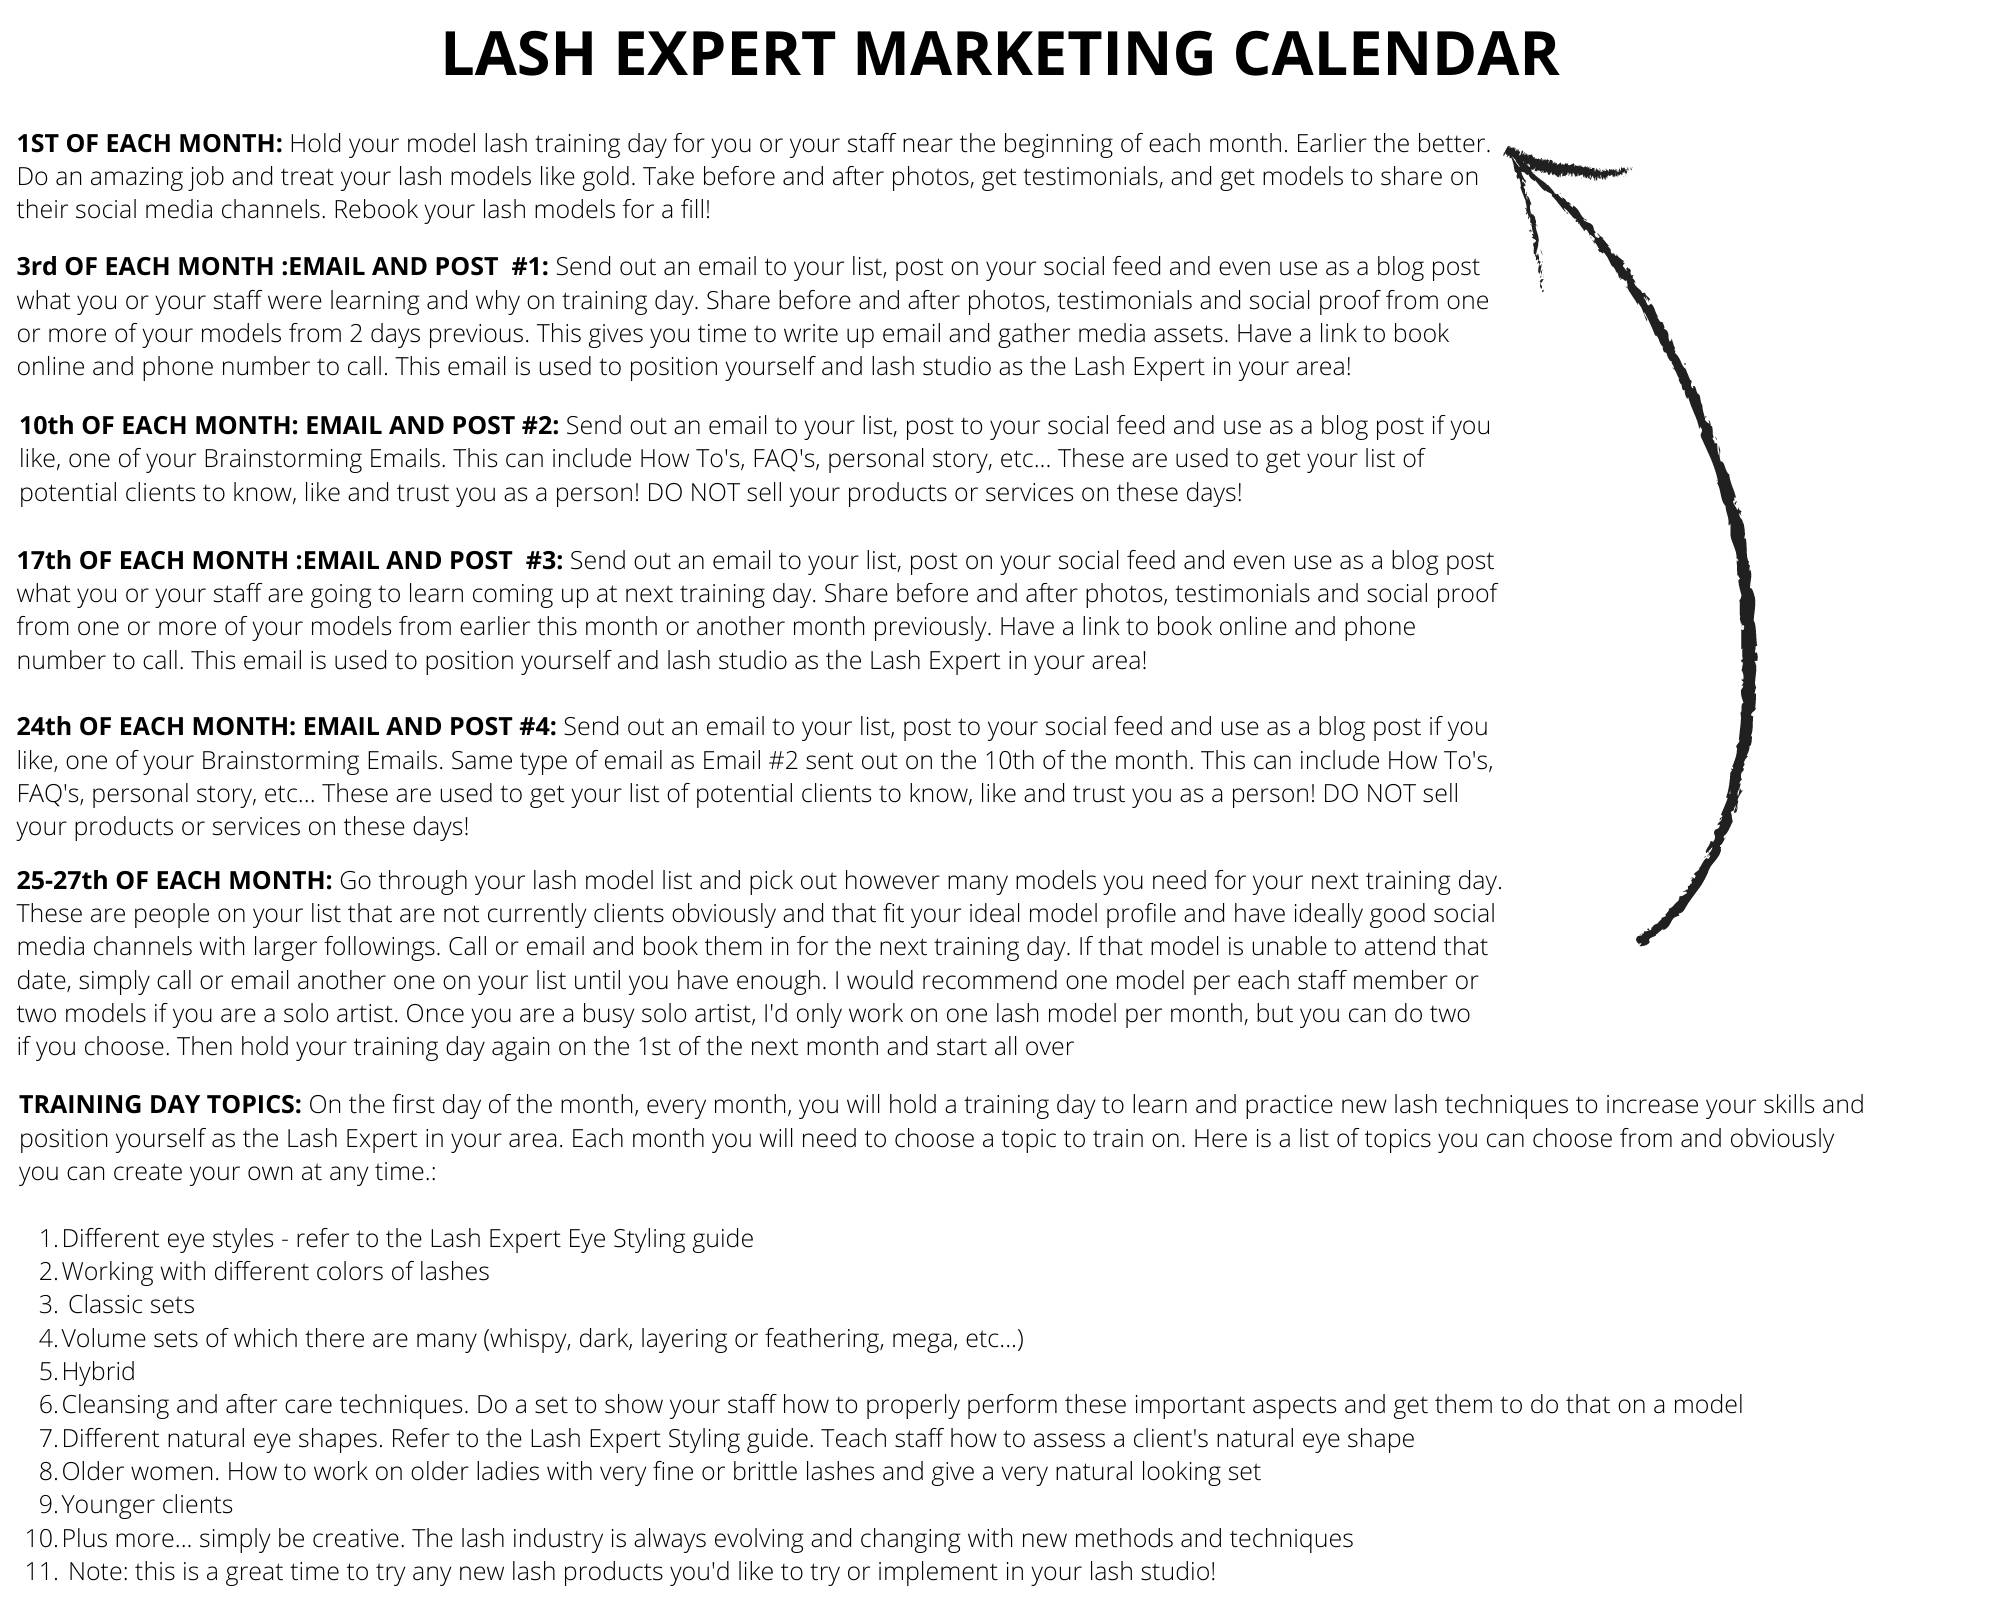
Please find the Training Calendar located below. Please print the calendar and step by step directions for your reference. The download links can be found below.
The training calendar has been created to keep your training and marketing organized and simple to follow.
Gathering Social Proof
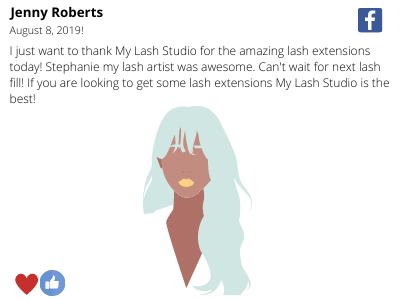
One of the most important parts of your marketing efforts using the Lash Expert Funnel is capturing social proof to use in your emails, social media channels and website. Social proof comes in a number of different forms from testimonials, before and after's, social shares and more.
Your job is to capture this proof and validation and use them to position yourself as the Lash Expert in your area. Here are just a couple examples (these are typical lash model posts examples):
I also wanted to share a few programs that have been vital to capturing social proof and creating my marketing over the years!
1. Tiny Take – for taking snap shots of anything on my laptop screen. Especially great for taking snap shots of your models or client’s posts on their social media channels! FREE by the way! Your laptop might come with an option right on it to capture snap shots as well.
2. Canva – perfect for creating images for almost anything! A very powerful program that is completely FREE to start, but you can upgrade to a paid version as well. I got away with the FREE version for over a decade! Game changer.
3. Pixelcut – this is a paid app on your phone for those of you who like to edit photos, make backgrounds white or any color, etc.. There is a FREE trial and then it’s a monthly subscription. For those of you who like this kind of thing, it has been helpful for me over the years, but you don’t need it.
4. And for those of you wondering if there is an app or which one is best to take before and after photos, I’m going to leave this blank as there is so many options out there now and it literally changes daily! Do some research and choose an app if you want to really be a little extra fancy, but now with the built in picture software on phones, you might not need this any longer!
Client Eye Styling Guide
Keep track of each and every clients lash style, natural lash profile, glue used, etc.. with this comprehensive client eye styling guide.
Eye Shapes + Lash Design Cheat Sheet
If you want to set yourself apart and become the expert in your area, you need to be able to create unique bespoke looks designed specifically for each and every client.
Learn what lash styles best suit each eye shape.
Lash Retention Secrets
If you’re goal is to have a successful lash business with long term or life long clients, coming every 2 to 3 weeks for infills, you absolutely need to have great lash retention.
Sometimes it's the smallest tweaks to your lashing routine that make all the difference!
Waiver + Client Consultation Profile
One of the most important parts of being a lash artist is doing a proper client consultation and learning what your client is looking for, medical conditions she may have and anything else you should know before you get started.
After Care Form
Customizable after care form to give your lash clients after each appointment defining the do's and don't's.
Drastically cut down post appointment issues after thoroughly going over the aftercare form with your client.
One of the best ways to save time in your lash studio is to automate certain tasks as much as possible. And any busy lash artist or beauty professional will tell you they spend a great deal of time booking appointments and rescheduling and messaging in general, so naturally we want to automate this as much as possible, but at the same time giving our clients a welcoming human touch as we do this.
I have found the best way to do this is to offer your clients the ability to book on your website or an app if it possible. Typically you can set up online scheduling through your website or an app for a small monthly fee. And I know no one likes spending more money, but it is money well spent. If it costs you, $20 to $50 or more a month, but saves you 10 to 20 hours a month in time or your receptionists time, is it worth it to you? If all you book is one extra fill a month or free yourself up to do one extra fill it more than pays for itself! It's a no brainer.
In the downloadable PDF, Salon Scripts, you will find a number of scripts that can be used to automate your social media channels, email and phone dialogue.
Over the years, I have tried to funnel my clients towards the online scheduling as much as possible to free up my front desk receptionist as much as possible (so she can help save me time with other things!) and this can definitely be done for the solo lash artist as well. Obviously, the less time you can spend on the phone or on social media, the more time you can spend working on your business or doing lashes!
Please download Salon Scripts below. Here's to you having more free time doing what you love!
BONUS MATERIALS
1. Zero to Booked Overview
2. Lash Ladder Cheat Sheet
3. Lash Studio Funnel Cheat Sheet
4. Customer Satisfaction Policy
5. The Ultimate Lash Funnel
